LoRa Device ( B-L072Z-LRWAN1 + X-NUCLEO-IKS01A2 )


Hello , In our Previous Articles Entitled " How To Connect Your First LoRa Gateway " We Built our First LoRa Gateway and Today we Will Connect Our first LoRa Device To our Gateway Step by Step.
Link to Our Previous Article : Link
** Let's Start our Project **
Today i will show you guys How to Setup , Build and Connect Your first Device step by step .
First of all we need to buy some component for our Project so :
Hardware needed :
First of all we need to buy some component for our Project so :
Hardware needed :
- B-L072Z-LRWAN1 Board From STMicroelectronics

- X-NUCLEO-IKS01A2 From STMicroelectronics

- Our LoRa Gateway


Software needed :
- IAR Embedded Workbench

- STM32 ST-LINK utility

Link To Download it : Link
- LoRaWAN software expansion for STM32Cube


Link To Download it : Link

First of all , Let's Talk about The Features of Each Board :
- B-L072Z-LRWAN1 :
This Board contain an STM32L072CZ Microcontroller , This Microcontroller Belongs to the category Of LOW Power ( LP : Low Power ) and 32 MHz max CPU frequency . Also Our Board Contain an SX1276 Transceiver . The transceiver features the LoRa long-range modem, providing ultra-long-range spread spectrum communication and high interference immunity, minimizing current consumption . Our Board is Based on :
The CMWX1ZZABZ-091 LoRa/Sigfox™ module (Murata) :

- - 860-930MHz LPWA Module
- - Chipset: Semtech (SX1276) + STM (STM32L)
- - Modulation: FSK, OOK and LoRa Modulation
- - Small form factor LoRaWAN module
- - MCU Chipset: STM32L0 Series
- - CPU: ARM Cortex-M0+
- - Peripheral Interfaces: I2C, UART, USB, SPI
- - Pre-certified radio regulatory approvals: 868 & 915 MHz spectrum

Finally , This Board is amazing , it can Be Connect Like a Sigfox Device or Like a LoRa Device.
* All The Technical Documentation you can Check it Here : Link *
- X-NUCLEO-IKS01A2 :
The X-NUCLEO-IKS01A2 is a motion MEMS and environmental sensor evaluation board system :

- LSM6DSL:
MEMS 3D accelerometer (±2/±4/±8/±16 g) + 3D gyroscope (±125/±245/±500/±1000/±2000 dps)
- LSM303AGR:
MEMS 3D magnetometer (±50 gauss) + MEMS 3D accelerometer (±2/±4/±8/±16 g)
- LPS22HB:
MEMS pressure sensor, 260-1260 hPa absolute digital output barometer
- HTS221:
Capacitive digital relative humidity and temperature
- DIL 24-pin:
Socket available for additional MEMS adapters and other sensors (UV index)
Our LoRaWAN Device Support Three Type of Class :

- Class A ( Bi-Directional End Devices ) :
- End-devices of Class A allow for bi-directional communications whereby each end-device's uplink transmission is followed by two short downlink receive windows.

- In addition to the Class A random receive windows, Class B devices open extra receive windows at scheduled times.

PNG : Ping Slots
BCN : Beacon ( Beacon Period )
What's Beacon ?
In Class B, the gateway broadcasts a periodic beacon every 128s . the beacon transmission is protected by a reserved period Called Beacon Period and it took 5.12s .
*) This is An Exemple for the Beacon ( BCN ) :

What's Ping Slots ?
Between two beacons, each end-device opens N reception slots called ping slots .
What's Ping Period ?
The ping period is the delay between two ping slots, and is constant. The offset between the beacon
and the first ping slot is pseudo-randomly chosen after each beacon by each end-device .
In The Link Bellow , You Can Check and See More Information About The Beacon Period ( BCN ) and Ping Slots ( PNG ) and Also More information About LoRaWAN Class B .
- Class C ( Bi-Directional End-Devices with maximum receive slots ) :
- End-devices of Class C have nearly continuously open receive windows, only closed when transmitting.

Diagram Explanatory for the three class of LoRaWAN

LoRaWAN Class A :
Advantages :
- Lowest power consumption = longest battery life
Disadvantages :
- Long latency
Example :
- Battery powered sensors
LoRaWAN Class B :
Advantages :
- Deterministic latency
Disadvantages :
- Higher power consumption
Example :
- Battery powered actuator end-device
LoRaWAN Class C :
Advantages :
- Lowest receive latency
- End-device has continuous receive window
Disadvantages :
- Highest power consumption (expect end-device to be mains powered)
Example :
- Mains power low-latency actuator end-device
Now, You Know which Class of LoRaWAN will be used , We will Just Send The Values of Our Sensors Motion and Battery Level From our Device To The Gateway. So ....... Yes is the Class A .
LoRa Architecture

Steps :
1) Creating Your device on The Things Network :
- Go To https://www.thethingsnetwork.org and Login to Your Account .
- Go To Console .

- Click on Applications .

- Access your application on The Things Network .

- Select Devices and click Register Device .

- Create Your Device ID to indentify your device on the network. On Device EUI, click on random button to generate it, then click Register.

- Our device was created on the network . The Activation Method is OTAA by default, We will click on Settings to change it.

- Select the Activation Method ABP and disable Frame Counter Checks The Device Address, Network Session Key and App Session Key will be generated Automatically. Click Save.

What's OTAA Method ?


What's ABP Method ?

Difference Between OTAA and ABP ?

2) Configuring B-L072Z-LRWAN1 Development Board :
- Go To The File That you Downloaded Named ( I-CUBE-LRWAN ) and Extract it .
- We Need This Project Example ( End_Node ) Follow my steps :
1- Click on STM32CubeExpansion_LRWAN_V1.2.1 ( The Extracted Folder )

File Location ( Path ) :


The Exact Location ( Path ) :
C:\The_Location_Of_I_CUBE_LRWAN_Folder\STM32CubeExpansion_LRWAN_V1.2.1\Projects\B-L072Z-LRWAN1\Applications\LoRa\End_Node\EWARM
- Open IAR Embedded Workbench
- Click On Project Then Click on Add Existing Project

- Choose Lora.ewp
C:\The_Location_Of_I_CUBE_LRWAN_Folder\STM32CubeExpansion_LRWAN_V1.2.1\Projects\B-L072Z-LRWAN1\Applications\LoRa\End_Node\EWARM
- Open IAR Embedded Workbench
- Click On Project Then Click on Add Existing Project

- Choose Lora.ewp


- Now , Right Click on " LoRa - mlm32l07x01 "


Add the define "X_NUCLEO_IKS01A2" on Defined Symbols Then Click on OK
Or Copy and Paste :
STM32L072xx
USE_B_L072Z_LRWAN1
USE_HAL_DRIVER
REGION_EU868
X_NUCLEO_IKS01A2
- Now , We will Make Some Change . Go To : Projects\End_Node\main.c\Commissioning.h.
In The Commissioning.h File :
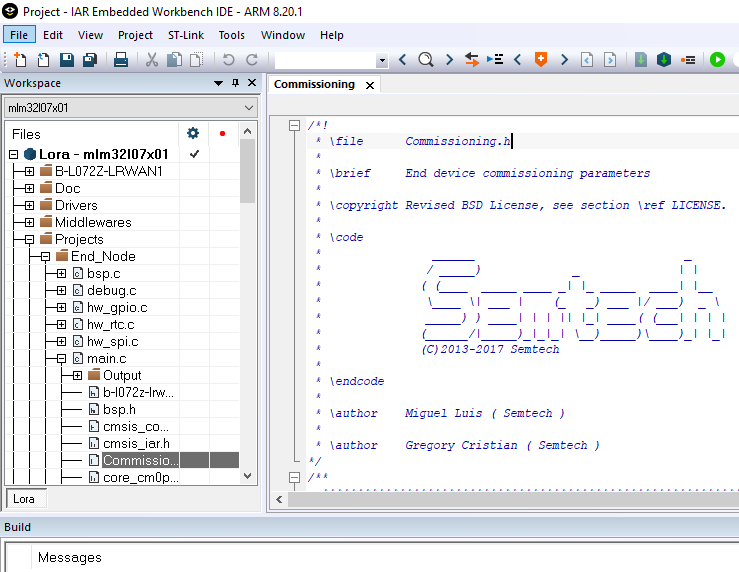
- Do Ctrl + f For Fast Search
Changes in Commissioning.h File :
1- #define OVER_THE_AIR_ACTIVATION 0
2- #define STATIC_DEVICE_EUI 1
3- #define STATIC_DEVICE_ADDRESS 1


- Open the "Device Overview" of your device on the Things Network. Use the information to change lines as the following images .

Changes The Informations in Red Box with Your Informations Fron TheThingsNetwork :
- LORAWAN_DEVICE_EUI ------------ with ----------- ( LoRaWAN Device EUI )
- LORAWAN_JOIN_EUI ------------ with ----------- ( LoRaWAN Application EUI )
- LORAWAN_APP_KEY ------------ with ----------- ( LoRaWAN App Session Key )
- LORAWAN_DEVICE_EUI ------------ with ----------- ( LoRaWAN Device EUI )
- LORAWAN_JOIN_EUI ------------ with ----------- ( LoRaWAN Application EUI )
- LORAWAN_APP_KEY ------------ with ----------- ( LoRaWAN App Session Key )

- LORAWAN_DEVICE_ADDRESS ------------ with ----------- ( LoRaWAN Device Adress )
- LORAWAN_F_NWK_S_INT_KEY ------------ with ----------- ( Network Session Key )
- LORAWAN_S_NWK_S_INT_KEY ------------ with ----------- ( Network Session Key )
- LORAWAN_NWK_S_ENC_KEY ------------ with ----------- ( Network Session Key )

- LORAWAN_APP_S_KEY ------------ with ----------- ( LoRaWAN App Session Key )


Attention !
Choose Hex Format For :
- LoRaWAN Device EUI
- LoRaWAN Application EUI
- LoRaWAN App Session Key
- Network Session Key
Follow images :


We Completed our Modification in This File ( Commissioning.h ) . So We Save our Modification .
- Next we Have Some Modification in An other File . This File Named ( hw_conf.h ) Go To : Projects\End_Node\main.c\hw_conf.h .(See The Picture Below)


Remove the comments from :
- #define DEBUG
- #define LOW_POWER_DISABLE
- #define SENSOR_ENABLED

- #define DEBUG
- #define LOW_POWER_DISABLE
- #define SENSOR_ENABLED
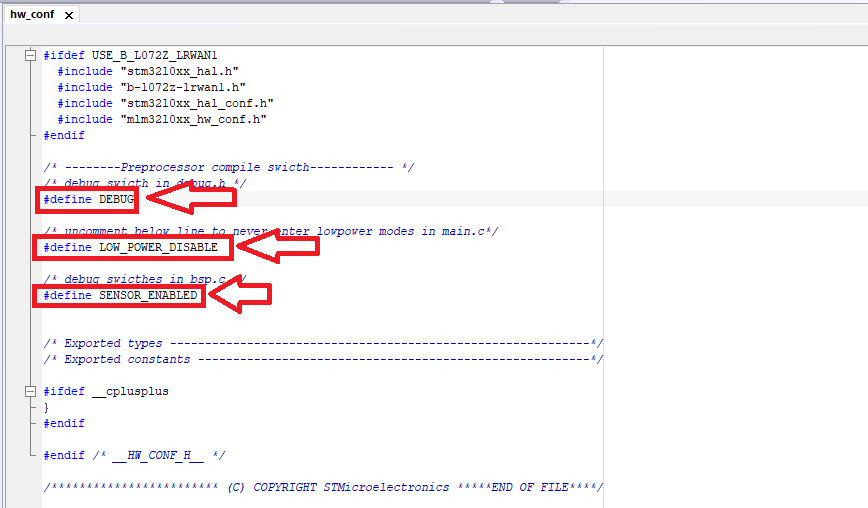
We Completed our Modification in This File ( hw_conf.h ) . So We Save our Modification
- Now we will Save All , Build and Download our Code .


My Results :


3) Make a Decoder for Your Payload Format :
- You must be receiving a hexadecimal payload on The Things Network. So , Now We Will Simplify The Understanding of This Data Let's Begin .
Copy and Paste The Code Below in The Payload Formats :
function Decoder(bytes, port) {
// Decode an uplink message from a buffer
// (array) of bytes to an object of fields.
var decoded = {};
// Decode bytes to int
var batteryInt = bytes[7]
var humidityInt = (bytes[5] << 8) | bytes[6];
var pressureInt = (bytes[1] << 8) | bytes[2];
var temperatureInt = (bytes[3] << 8) | bytes[4];
// Decode int to float
decoded.battery = (batteryInt*100)/254 // Battery in %
decoded.humidity = humidityInt / 10; // Humidity in %
decoded.pressure = pressureInt / 10; // Pressue in hPa
decoded.temperature = temperatureInt / 100; // Temperature in °C
return decoded;
}

Data Received :


Congratulations
RépondreSupprimerCe commentaire a été supprimé par l'auteur.
RépondreSupprimerHi,
RépondreSupprimerThanks for your work.
Actually i'm working on the end node example of the I Cube LRWAN V1.2.1 and when i set the application duty cycle to 15 seconds (for statistics aim only and not deploying ) i face a problem. In fact the end node starts sending data regularily only after 10min of joining the network server, and during these 10 min there are some transmission but not regular ones(not with the fixed 15s interval).
Do you know why i have this delay before guetting regular transmissions ?
This blog is really helpful for me as I was looking for high performance Submersible Level Transducers at affordable rates.
RépondreSupprimerH-Duty Pressure Transducers